Broadlight Lamp Refurbishing
Today, I embarked on my first foray into making lamps. After reading more than halfway through "All About Lamps Construction Repair and Restoration" by Frank W. Coggins, I couldn't resist the urge to see how I could take a wayward fixture and make something different and hopefully more beautiful of it.
I started out going to a thrift store, run by the Vietnam Veterans of America. They had a nice assortment of lamp bases and some detached shades. I found a very nice white lamp base that was $2 below the asking price of similar lamps. The reason? It was missing a harp, the framing piece that stands a lampshade over the bulb and socket. The cord looked a little old and tired. It also had a turn knob for a switch and I was hankering to change that to a pull switch.

I also bought a lampshade, a rather dainty old-fashioned one that I thought might go well with this lamp (I turned out to be wrong - my opinion). The shade sported flat sections with a wavy bottom side lined with a rather lacy strip to fancy it up and give it an old-fashioned look. I thought it might work with this lamp because of the angles of the lamp corners and gold floral patterns on the ceramic.

I went to a couple of hardware stores to get the new parts I needed. The first was a pull-chain socket. Next was a harp, cord wire and an AC plug. Not only was I going to wire up the lamp at the socket, I planned on giving the lamp a brand new cord and wall plug.
The original lamp had what appeared to be the bottom part of a harp assembly. Without a full harp, there was no hope of fitting the shade or any other shade on this lamp. The question, however, was what size. At the hardware store there were four different sizes - 8 inches, 9 inches, 10 inches or a foot. A foot seemed way too big and 8 and 9 inches seemed a little small. It really came down to choosing between 9 and 10 inches and I elected the latter. I thought about buying both and trying both on for size, but that seemed to be a lot of work as I found out later, so I went with the 10 inch harp.

Once at home I took the original lamp apart, unscrewing the assembly at the top. When it came loose, I discovered the big white ceramic piece came loose from the brass bottom. What held it all together was a long pipe through which the cord ran from top to bottom and out of the bottom through a hole in the side. The pipe, sometimes called a 'nipple' in lamp-making jargon was threaded at both ends. A small nut at the top held it in place and once loosened, another nut at the bottom came loose.
The first thing I had to do from there was remove the socket assembly and disengage the wires. Once that was accomplished, I could remove the harp bottom and the old cord. One of the problems I encountered was that bottom brass piece was sealed off with green felt. I had to cut it away so I could retrieve the nut that fastened the nipple at the bottom. I will have to consider replacing the felt at a later time, but for now, it seemed to be in the way of my project.
Next, I threaded the new cord through the bottom piece on up through the nipple, which ran through the main body and the upper assembly. At the very top, I split the two sides of the wire, about three inches from the end. I used a tape measure and a felt marking pen to mark the three inches. Then I marked each strand at 5/8ths inch and used a wiring tool to strip away the rubber wire insulation from the strands, exposing brilliant copper wires.
One of the hard parts for me was twisting the copper wires to bring them together. It seemed that no matter how much or how thorough I twisted those wires, they always seemed to want to come off and fray. following the directions from this video I tied the two wire strands in an underwriters knot, then connected the wires to the socket terminals. I took great care to ensure that the ribbed strand was connected to the silver terminal and the smooth strand connected to the brass terminal. Sometimes it's not so easy to see because the the strands, when pulled apart, creates a ribbed bevel in the smooth strand. You have to examine the strands carefully to notice the additional ribs on the grounding strand. Connecting the copper wires to the terminals posed its own challenges. After they've been twisted to form a solid strand, you have to form a hook-like shape to fit it around the terminal screws and sometimes, the copper strands don't want to stay together. I struggled with that for a little bit and with the help of a very short flat head screw, I was able to tuck the exposed wire into place and screw down the terminals very tight.
The lamp assembly was now finished, but there was one more task - adding the AC plug to the other end of the cord. I went through the same process of splitting the two strands of the cord and stripping the insulation. Then I attached the exposed copper wires to the proper terminals inside the plug unit. This piece was rather easy as one side of the plug housing opened up on a hinge. Then you could just lay down the wires, attach them to the terminals, making sure the ribbed side attached to the silver terminal and the smooth side attaching to the brass terminal. I closed plug assembly and screwed it together.
The lamp was pretty much complete and ready to plug. All I had to do was place the lamp shade on the threads at the top of the harp, plug it in and admire my new creation. However, one small piece was missing - the finial. The finial is a decorative, closed nut that screws onto the top of the harp, thus fastening the lampshade to the harp. The new harp I had bought did not come with a finial. What was I thinking?
Just for proving sake, I borrowed a finial from another lamp and got the completed look. Here is the finished product:
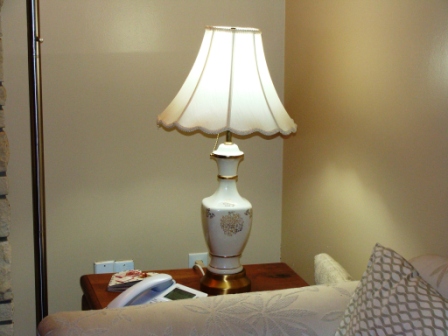
I felt a lot of pride knowing I put this together. Then my critical eye took over, as well as my wife's. We placed the lamp in our bedroom and looked at it in different positions. We also tried different bulbs to check lighting intensities. What we found a little off was that the shade was too small. We felt the shade should cover up the assembly above the ceramic body. However, you can see the sleeves, nuts and socket assembly from many angles. The only thing we'd like to see is the body and the pull chain. Proportionally, the shade and lamp body seemed mismatched as well, although the shapes, of themselves, seemed pleasing. Together, they don't quite work, but this is just a first effort. Revisions will be made and this lamp will definitely look better once we've made some changes.
posted by Broadlighter at 1:45 AM
![]()

1 Comments:
Nice work. Thanks for posting. Had to recently repair a "gifted" lamp and found your experience helpful!
Post a Comment
<< Home